Posts

Office 365 - Creating Trial Account

Image
Office 365 - Creating Trial Account Office 365  is a subscription service that includes the most recent version of Office, which currently is Office 2016. It comes with the applications you’re familiar with, like Word, PowerPoint, and Excel, plus extra online storage, ongoing tech support at no extra cost, and more.  You can choose to pay for an Office 365 subscription on a monthly or yearly basis. Office 365 for business or education Sign Up for Free Trial : Office 365 Enterprise E3 Sign In : portal.office.com You will be welcomed with your Home Page.  You can now explore all the features of Office 365.  Hope this helps. 

Second stage Recycle Bin

Image
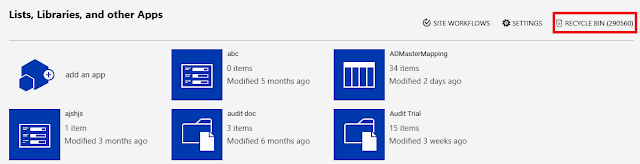
SharePoint: Second stage Recycle Bin SharePoint Servers are having a Second stage Recycle bin as well. This is the same as Windows Recycle Bin. The deleted documents will be moved to the SharePoint Recycle Bin. Users will be having their own Bins and cannot see others. By default, the items in Recycle Bin will be deleted after 30 days. The SharePoint Administrators can change these settings based on their requirements.  For Deleting items from SharePoint Recycle Bin, visit   Emptying SharePoint Recycle Bin   After emptying your Recycle Bin, you might want to check your database tables. You'll find the records are still in the table and the database is even bigger. I had to do some research and found that SharePoint is having a Second stage Recycle Bin also. And the tables got bigger only because of the transaction logs. Now we have to deal with these junks to reduce the DB size.  Step 1 : Log in as Site Administrator Step 2 : Goto Site Settings Step 3 : Un...

Clear SharePoint Site’s Recycle Bin using PowerShell Script

Image
PowerShell : Empty SharePoint Recycle Bin I have been in this situation where my SharePoint 2013 Recycle Bin is filled up with over 3 lakh items to delete.  I believe only PowerShell can do this magic. And the below script took me around one hour to delete all items.  $Site = Get-SPSite "SiteUrl" $RootWeb = $Site.RootWeb foreach($web in $RootWeb.Webs) {       $web.RecycleBin.DeleteAll(); } $Site.RecycleBin.DeleteAll(); $Site.Dispose(); Hope you find this helpful.  For more information on Second stage Recycle Bin , visit :  SharePoint Site CleanUp

Configuring SharePoint Server 2016 Step by Step

Image
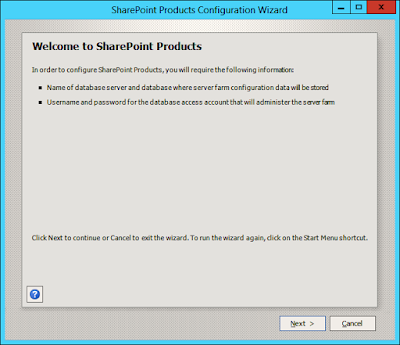
Configuring SharePoint Server 2016 Step by Step To Configure SharePoint Server 2016: 1. Run the SharePoint 2016 Products Configuration Wizard.  2. A welcome screen will be displayed after restarting the required services. Click Next. 3. Choose Create a new server farm and Click Next. 4. Specify Configuration Database Settings and Click Next. 5. Specify Farm Security Settings and Click Next. 6. Specify Server Role and Click Next. (We are using a Single-Server Farm) 7. Specify the port number for hosting Central Administration. (We are using port 100 as a standard.) 8. Review the Configuration and Click Next.  9. Products Configuration will be now started.  10. Click Finish once the configuration is successful. SharePoint 2016 Products Configuration is now completed. We have done a Single-Server  Farm Setup. You can do a Multi-Server Setup if required. But if  you have selected Single-Server Farm...

SharePoint Server 2016 Installation Step by Step

Image
SharePoint Server 2016 Installation Step by Step The SharePoint Server 2016 is now available for a trial period of 180 days. We are about to do a Single Server Installation and Initial configuration with the Database on the same server.  For System Requirements and an overall installation walkthrough,  visit my previous blog .  To install SharePoint Server 2016: 1. Double click the disc image file to mount it as a drive on your computer. 2. Navigate to the mounted drive. 3. Run splash.hta to launch the SharePoint Server 2016 Start page. 4. Click Install software prerequisites to launch the Microsoft SharePoint 2016 Products Preparation Tool. 5. Click Next to  begin online installation of prerequisites. 6. Prerequisite installation will be started. You'll need to Restart your server several times during this process.  7. Click Finish to Restart. 8. Verify whethe...

SharePoint 2016 Installation - Overview

SharePoint Server 2016 Installation Environment Required: Windows Server 2012 R2 SQL Server 2014 SP1, 64 bit To install SharePoint Server 2016: 1.  Double click the disc image file to mount it as a drive on your computer. 2.  Navigate to the mounted drive. 3.   Run   splash.hta   to launch the SharePoint Server 2016 Start page. 4.  Click   Install software prerequisites   to launch the Microsoft SharePoint 2016 Products Preparation Tool. 5.   Follow the instructions in the tool to complete the installation of the software prerequisites. 6.   On the   SharePoint Server 2016 Start   page, click   Install SharePoint Server   to launch Microsoft SharePoint Server 2016 Setup. 7.  W hen prompted, provide a product key. You can use one of the following trial product keys. The trial period is 180 days. You can convert to a licensed installation at any time during the trial or after the...

Create Self Signed Certificate

Image
Create a Self Signed Server Certificate - IIS7 Create a self-signed certificate for a local computer for one or more of the following reasons: Troubleshooting third-party certificate problems. Managing IIS remotely. Creating a secure private channel between your server and a limited, known group of users, such as that in a software test environment. Testing features that rely on SSL settings. Warning :  This procedure generates a self-signed certificate that does not originate from a generally trusted source; therefore, you should not use this certificate to help secure data transfers between Internet clients and your server.  Self-signed certificates may cause your Web browser to issue phishing warnings. Create a self-signed server certificate Open IIS Manager and navigate to the level you want to manage. In  Features  view, double-click  Server Certificates .  In the  Actions  pane, click  Create Sel...